

How To Do Fiberglass Boat Repair
Disclaimer: As an affiliate I may earn a committee on any qualifying purchases, including those from Amazon.com, at no actress cost to you – read more.
Yous're out for a day of cruising in your new gunkhole, weaving in and out of islands on your favorite lake. After a long day out on the h2o, y'all turn around to head back to the boat launch, only to hear the dreaded scraping and crunching of your gunkhole confronting a shallow stone. Your center sinks as you recollect of all the time and money it will take to repair your gunkhole if you ship it into the shop.
Only what if you could repair your fiberglass gunkhole hull all on your ain? Sound crazy? It shouldn't. While fiberglass boat repairs are a flake more complicated than those you'd notice on wooden boats, virtually small dings, scratches, and even small holes are, indeed, repairable. To help yous go started, nosotros've got the ultimate guide to repairing a fiberglass boat hull from the outside, complete with tips and tricks to help get your boat back on the h2o in no time apartment.
- How To Find a Leak in a Fiberglass Gunkhole
- Identifying a Pocket-sized Leak
- Finding the Source of a Leak
- How to Repair a Fiberglass Boat Hull
- Emergency vs Long-Term Repairs
- Emergency Repairs
- Does Flex Seal Work on Fiberglass Boats?
- Long-term Repairs
- Emergency Repairs
- In-Water vs Out-of-H2o Repairs
- In-H2o Repairs
- Out-of-H2o Repairs
How To Discover a Leak in a Fiberglass Boat
While some holes in boat hulls are caused by a catastrophic collision, many more seemingly come up from nowhere. Often, these pocket-size leaks build up over time then slowly that you don't know information technology'south happening until information technology actually does. This kind of progressive hole development can be scary, especially since h2o can beginning coming into your boat without giving indicators equally to how or why got in there.
Identifying a Pocket-sized Leak
If you've got a leaky boat, you first demand to figure out where the leak is coming from, which tin can be trickier than it seems. That being said, there are some telltale signs of a leak that often happen before water starts flooding into your boat.
Often, with leaks, prevention or early intervention is key to reducing potential damage. Every once in a while, yous'll want to become around and inspect your boat, merely to check to run into how things are doing and if there are any pocket-sized problems that you tin quickly fix.
When information technology comes to leaks, look for paint bubbling or breaking downwardly near an overhead or deck on the gunkhole's interior. You might as well notice discoloration or corrosion on some of your metal fixings. If some of your fixings have this issue and not others, you may have a leak on your hands.
Finding the Source of a Leak
One time y'all identify that your boat is leaking, it'south at present time to identify the source of the leak. In that location are a few unlike methods that you lot tin can utilize, then let's wait at a few of them here for holes above the waterline:
- If you have a buddy, you can ask them to stand up inside your boat as you become a hose with a spray attachment. Once you have your hose ready, brainstorm spraying water onto your boat, starting away from the suspected pigsty site and moving slowly toward information technology. Your friend on the inside of the boat tin alert you when they kickoff seeing water. Voila! Y'all've got your leak.
- Should water not be an appropriate method for identifying a leak in your boat, you lot can endeavor to use a tin of compressed air. Outset by sprinkling some baby powder onto the outside of your boat and then employ the compressed air to blow on the location from the inside. If you lot've found the source of the leak, you'll probably notice a disturbance in the baby pulverisation on the outside of the boat.
- If you want to get fancy, you can besides get yourself an ultrasonic leak detector to discover your leak. This engineering science basically transmits soundwaves through your boat and uses that information to identify where in that location might be a hole in your boat. That's some pretty cool stuff.
All of those methods are fine and dandy for leaks above the waterline, only what do you do if the hull of your gunkhole is leaking? Here are some suggestions:
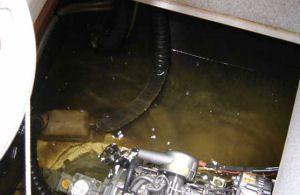
- First and foremost, unless the source of the leak is obvious (due east.g., a large hole), you'll want to starting time by completely drying out the bilge. Yous tin practice this by letting your bilge pump do its chore and then going in later it'south finished with a sponge and some towels to dry the place out properly.
- In your fiberglass boat, y'all'll want to so check all of the various hull penetrations for potential leaks. A good flashlight or headlamp is indispensable here.
- If the leak source still isn't obvious, you'll want to start by checking out all of the diverse fittings in the bilge. Wipe the hull plumbing fixtures off with a newspaper towel to dry it completely, shine a light on it, and rub your hands over the fitting. Oft, your fingers will feel h2o coming in through a hole that yous can barely see.
- Should the leak still not be credible, you may have to look inside a closed compartment or under the edge of a hull liner. Sometimes, y'all demand to cut a small access hole to check out these spaces and become a pump in there.
- If your boat is a powerboat with a double lesser hull that's filled with flotation foam or liners, it'll exist pretty difficult to expect for a leak without getting fairly subversive. And then, if you're nonetheless struggling to notice the leak, you might desire to haul the boat out onto country when the bilge is notwithstanding full of h2o and investigate from the exterior. You might discover a trickle of water leaking out that'll give you an thought of where the leak is coming from.
How to Repair a Fiberglass Gunkhole Hull
Once you find your leak, it'southward fourth dimension to fix your gunkhole and become it back in great working order. While many people accept their boats to the shop for a professional person repair, information technology's frequently not necessary to do then if you have a few simple skills. Additionally, fifty-fifty if you'd prefer to leave it to the pros, all boat owners should know how to do some simple hull repairs, just in case you need to do 1 in an emergency.
To help you lot become started with your repairs, we'll walk yous through some of the basics of fiberglass boat hull maintenance. We'll talk near different products you tin use to repair your boat, how to take on some emergency repairs, and the divergence betwixt in-water and out-of-h2o fixes. Here we go!
Amazon has TotalBoat Thickset Articulate Expoxy – Check Pricing
Emergency vs Long-Term Repairs
If you're out and about on the water and you detect a pregnant leak, chances are pretty skillful that yous'll want to fix that leak, pronto. Sizeable leaks can cause some serious damage to your boat or even put yous in danger, so anyone operating a boat should know how to practise an emergency repair to their hull, but they should as well know how to recognize a repair that can expect until you're back int the marina. Let's take a look at the difference between emergency and long-term repairs now.
Emergency Repairs
Emergency repairs are the kinds of fixes that demand to happen at that very moment or you could exist at chance of having a prissy day on the water turn into a disaster. During an emergency repair, your job is to slow the leak down as much every bit possible then you can hobble back to a prophylactic haven, be information technology your home marina or another port.
A good option during an emergency is to use a "collision mat," which is basically a heavy-duty tarp with lines fastened to it that can exist pulled under the boat. When you pull the collision mat under your boat and cover the site of the damage, y'all tin slow or mayhap fifty-fifty stop the leak to allow your bilge pump to catch up. Of course, using this method requires that y'all have a collision mat on board, though you can find these at almost major marine stores.
Does Flex Seal Work on Fiberglass Boats?
If y'all've watched a scrap of TV at some point during the last 5 years, yous've probably heard of Flex Seal, the self-proclaimed super tape that can exist used to ready any surface. At ane point, ane of the Flex Seal commercials showed the company's spokesperson fixing a boat with the tape alone, encouraging millions to think that they, too, could save a lot of money and time past using Flex Record on their boats.
While Flex Seal tin, indeed, be used to fix a boat, it's really more of a band-help than a long-term fix. If you lot really care for your boat, yous'll want to take the time to do a thorough proper fiberglass repair to make certain it can withstand the test of fourth dimension. Only, since Flex Seal does make for a great emergency fix, it's worth carrying around in your toolbox, but in case.
Long-term Repairs
Unlike emergency repairs, long-term repairs are done with the goal of permanently fixing the source of the leak in your gunkhole. These repairs are almost ever more labor-intensive than an emergency repair as they're designed to stop the leak, once and for all. Allow's take a expect at options for long-term hull repairs.
In-Water vs Out-of-H2o Repairs
If you need to repair a hole or leak in your fiberglass boat hull, y'all have two choices for how to keep: you can take your boat out of the h2o or leave it in. Leaving your boat in the water has the clear do good of saving y'all both fourth dimension and hassle, but does make it more difficult to repair certain kinds of leaks. In fact, there are times where you'll definitely need to remove your boat from the h2o. Here are some general guidelines for how to repair your gunkhole in either situation:
In-Water Repairs
In-water repair jobs are usually reserved for when a boat leak is coming from a identify above the waterline, where some quality caulk fabricated for marine purposes can do the trick. Often this gets applied to cracks effectually window frames and other like locations. Be sure to read the instructions of your particular make of caulk so you give the cloth enough time to cure and stop the leak for good.
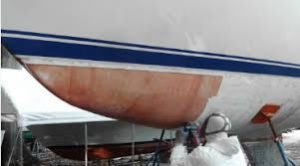
Out-of-Water Repairs
If a leak is coming from below the waterline, you'll probably have to haul your boat out to practice a long-term repair. Even if a leak is easy to pinpoint (i.e. coming through a plumbing equipment), you'll almost always take to replace the entire fitting to permanently stop the leak. After replacing the fitting, you can add a coat of sealant for extra security.
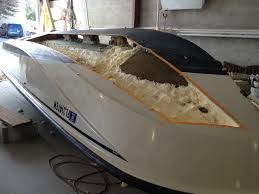
If the leak in your boat is coming from a cleft or hole in the fiberglass of your hull, you lot'll need to either ship it in for repairs with a professional or accept the fourth dimension to make the repairs yourself. Should yous choose to repair your boat on your own, you'll need all of the following materials:
- Rotary tool
- Sanding block
- Safety glasses
- Buffing chemical compound
- Gel coat (run across recommendation)
- Acetone
- Disposable spray gun
- Gel coat reducer
- Powdered fiberglass filler
- Sandpaper
- Wax
In one case you lot take all of your materials, it'southward time to get started with the repair. Here are the general steps you lot'll demand to follow to fix most gouges and small holes in your fiberglass boat hull:
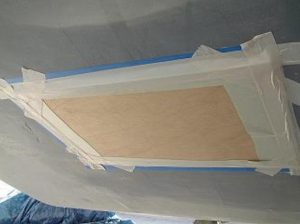
- Clean your gunkhole. The all-time way to beginning a repair is to requite your boat a nice launder and make sure it's super make clean before you start working on information technology.
- If yous've got a deep gouge or cut in your fiberglass hull, y'all'll desire to round out the edges and create a u-shaped groove by using a rotary tool. This will help eliminate sharp edges and brand your repair look and perform better once all is said and done. Lighter scratches can be sanded out past using 80-dust, 150-dust, and finally 240-dust sandpaper.
- Mix up your powdered fiberglass filler with your gel coat to make a thick paste and stir. Once you've got the right consistency, you lot can apply it to the gouged areas. You'll desire to overfill your gouges slightly and then y'all tin sand them down afterward information technology cures.
- Once the fiberglass filler cures, which can accept one to two hours, you tin sand it down with 80-grit sandpaper.
- Adjacent, you'll want to mix upward a new batch of gel coat pulverization (don't add the fiberglass filler this time) and some gel coat reducer (follow the label directions) and load it into your dispensable spray gun. Spray the newly patched area in small amounts.
- In one case the gel coat has cured, you tin can sand it downwards with 600-grit and 800-dust sandpaper. If you're really looking for a perfect repair, you tin effort using a 1200-grit moisture/dry sandpaper for extra smoothness.
- Finally, go your buffer out and showtime bugging the new gel coat. You should get-go slowly, buffing small sections at a time with medium pressure that eases up as yous buff.
Congrats, your fiberglass boat hull repair is done and it's time to get back on the water! While fiberglass boat repair may audio scary and expensive, small and moderate gouges in your hull don't have to be a nightmare. With the right tools and skills, you lot can find a leak and fix it before it becomes a trouble. Happy boating!

How To Do Fiberglass Boat Repair,
Source: https://towers4boats.com/how-to-repair-a-fiberglass-boat-hull-from-the-outside/
Posted by: stegmanthoning.blogspot.com
0 Response to "How To Do Fiberglass Boat Repair"
Post a Comment